Wednesday, August 31, 2011

Scrap Ruffle Necklace


I recently saw a necklace on pintrest and I really liked it. (Her shop is very cute by the way, I will take any of those items!) 
I knew that it really could not be all that hard to make, so I tried it. It turned out really well, not as good as hers, but still pretty good for free.  
I started with a necklace I was not using, and a fabric scrap. I think it was about 2 1/2" wide and 8" long. 
 Because I used a fabric that frays very easily, I first used a zig-zag stitch to prevent further fraying.
 Now we can sew our ruffle.  I used  a 1/4" seam allowance, and folded the fabric in half.
 Use the normal extra long stitch, and pull one thread to create a ruffle. Once the ruffle is the desired length, the ends can be tied off, so the ruffle does not come out. Now you can simply use a safety pin to thread the necklace through the ruffle, and you are done.
 Now you can trade out that ruffle to match any outfit. I like to wear my navy ruffle necklace with a salmon colored tank, and navy cargo pants. So many options, and it adds just a little cuteness.


Tuesday, August 30, 2011

Crochet Baby Props

After Bryson was born my sweet friend Kersandra took some newborn photos for us. They turned out so cute, and I am so grateful that we have these great pictures to look back on. If you are in the Colorado area and need a photographer give her a call.

I did not have time after Bryson was born, but I wanted to make a few things that Kersandra could use for her future photo shoots. I made a baby cocoon and a long elf hat. They turned out really cute, even though my model is no longer a newborn.
I can't believe this baby wore a 6 month sized outfit yesterday. So sad how fast they grow.
He is still very cute, even if he can't fit into a baby cocoon.
I did not even try the hat on him, I knew it would be too small.
I got to see the hat on my friends newborn, and I assure you it is just precious on a little baby head.
I need to get to work on a cute winter hat for Bryson's little head. Maybe big brother needs a matching one. Too bad I have to actually care for them instead of making cute things for them all the time. ; ) Hope everyone is having a great week. We have family in town, but I hope to stop by to show off some things I have been working on. See you soon!

Friday, August 26, 2011

Toilet Paper Roll Wreath

If you are here from a link party, welcome! Thanks for stopping by and I hope you are able to stay awhile, and take a look around.

The first project in the series on toilet paper roll crafts is a toilet paper roll wreath.
 My inspiration was this faux rosewood wreath I have been wanting for forever. It is so lovely, and from my fav target. Even though it is pretty inexpensive, it is still more than free!
First step was to save up a bunch of toilet paper rolls. Then I cut them into about thirds.
Once I had quite a few third pieces of toilet paper rolls, I was ready to cut them into spirals. Once they were cut I could curl them back around on themselves to make little rosebuds. I started to place the rosebuds around a dollar store wreath form that I already had.

Once I had what looked enough rosebuds, I started hot gluing them on, to cover the wreath form. They are pretty much all different sizes, so it does not look exactly the same all over.  
Last step is to spray paint it your color of choice. I choose a white, but I had it on hand. If it was my perfect world, I would have done a cream or more natural white. I even like it un-painted, in the natural cardboardish colors.
After it is painted, you can hang it up with a ribbon, and you are done! 
Pretty awesome for free huh?
Make sure you come back to check out the rest of the toilet paper roll projects in the near future.


linking up to:
http://tatertotsandjello.blogspot.com/
http://thetrendytreehouse.blogspot.com/
http://brandyscrafts.blogspot.com/
http://www.somewhatsimple.com/

Thursday, August 25, 2011

Toilet Paper Roll Crafts

Did you know that there are a ton of things you can do with toilet paper rolls? One mans trash is another mans treasure! I was feeling inspired to not only recycle these little tubes, but to reuse them!

I am starting a little series on using toilet paper rolls; and some wrapping paper rolls, and paper towel rolls too. And I will take these pieces of trash and turn them into something you can use! The series may be sporadic as we use more toilet paper, too bad I did not think of this while pregnant!
So start saving up those rolls!

If you decide to make a toilet paper roll craft of your own, make sure to grab the button on the right, and hopefully we can do a link party in the future.

Just for some inspiration here are a few amazing pieces of art made with toilet paper rolls via the addiction that is Pintrest.
                                                                                  Source: honestlywtf.com via Melissa on Pinterest


                                                                                        Source: honestlywtf.com via Melissa on Pinterest
                                                                                   Source: anastassia-elias.com via Melissa on Pinterest

 Hope you come back to see all of the creative an interesting toilet paper roll crafts!

Tuesday, August 23, 2011

The non-diaper bag

First off, if you are here via a link party, thanks for stopping by, and I hope you stay a little while and have a look around!

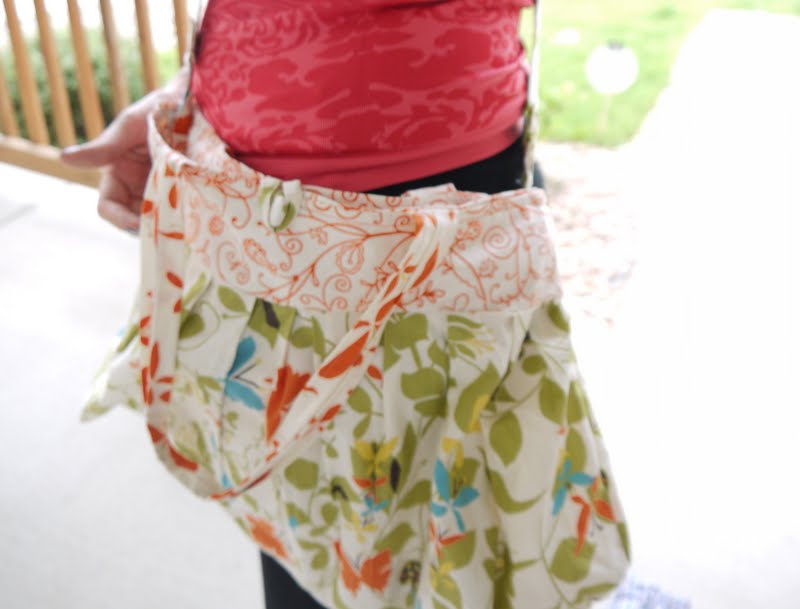
Before Brady was born I received an amazing coach diaper bag from my mother and sis in laws. I loved/love it, and have gotten so much use out of it. Recently I had started to want a little change. Something a little different. I love that bag, but since I also use it as a purse, I wanted a little something new after all this time. Something that could function as a diaper bag, but looks a little more like a purse.
I decided to use some fabric that I had been saving for something special. I love this fabric. It was my first try at really making my own pattern. I typically go off of something I saw online, or a pattern I got somewhere. I think it turned out pretty well. I would change it slightly, like the way the pleats turned out, but not too much.
 The lining inside has a large zipper pocket on one side.
 And two large pockets on the other side. With my label of course.
 Making it work, I used a fabric covered button and loop for a closure, but next time I would do a magnetic closure.
 It has a long over the body (or stroller) strap, and two shorter shoulder straps.
 So I really like it, and the price is pretty amazing.
 Best part, it still fits all of this nonsense in there, with room to grow!
 I have gotten one compliment on it, and I will admit, it feels good when you know you made it all! So what do you think? Old lady-ish, or kinda cute?


Linking up to:
http://thetrendytreehouse.blogspot.com/
http://todayscreativeblog.net/
http://brandyscrafts.blogspot.com/
http://www.somewhatsimple.com/
http://tatertotsandjello.blogspot.com/

Wednesday, August 17, 2011

Flower pom pom necklace

I saw a tutorial via pintrest for a pom pom necklace. I was wanting to make something similar, so the tutorial gave me some inspiration.
Because I am in my no fabric buying, make it work phase, I cut up an old yellow tshirt I never wore and used that. I also used an old cheapy chain I have not worn in years.
I think it is really cute.
I had a specific outfit in mind for this necklace.
Our family pictures.
I love them and cannot wait to get them all hung up and framed.
My whole life right there! <3

Related Posts Plugin for WordPress, Blogger...